To access the configuration of Lovelace interface, click on the three dots button in the upper right corner of the screen. You will be able to access the configuration of Lovelace interface.
Lovelace currently supports 24 cards, and there are many custom-made community cards. In the framework of this series, we only refer to the available cards.
First, we learn about changing names. As you can see in the picture below, as long as we click on the pen image next to the “Home” name, we can change the Home Assistant name to another name we like.

Next is the configuration on TAB. You click on the pen next to the first tab, we will enter the tab configuration. In SETTINGS , we have the following configurations:
Title: the name of the TAB, this name will appear if you are in the icon settings.
Icon: follow the “mdi:” structure + icon name (as shown below). Name of the icon you searched in https://materialdesignicons.com
URL Path and Theme you don’t need to change. Click Save to save.
The BADGES section will help you set up circular icons below the TAB row. Simply click BADGES and select the entitties you need to be able to see them

BADGES are these round round icons for you guys

Find the icon name in this page.

We enter the first card is Entities . This card makes it possible to set up a group of devices that share the same card. You stick like pictures ( three dots – plus sign – ENTITES ) to enter entities settings.

This card configuration is as follows:
Title : You name your device group. Having just finished naming it on the right, it appears already. On the right is the preview, guys
Entities : You turn down and choose the right equipment you need in the device group. I chose the balcony and Camera3 lights
Finally click Save to finish.

Next we find out the card ENTITY BUTTON. This card helps us create a button that has many effects.

The configuration of this card is as follows:
– Entity : you choose the device you need to set up
– Name : you name
– Icon : how to get icon as above
– Tap action : there are options for you
1 / more-info : select this, when clicking the button will open the information panel of the device
2 / toggle: select this item, when you click will rotate the status of the device on and off
3 / navigate : this section helps you to redirect the url you want. eg / lovelace / or / states / ….
4 / call-service : call the service you want when clicking the entity button.
If you have set it up, the right side has already previewed. We can also click to try. See ok then we press SAVE.
– Hold action : set to when pressing and holding the Entity Button. There are also options like tap-action and the effects of these options are similar

The next 4 cards are Gauge, Light, Picture Entity and iFrame. These cards are also in the common card class so I will try to share them before we go through the more difficult cards
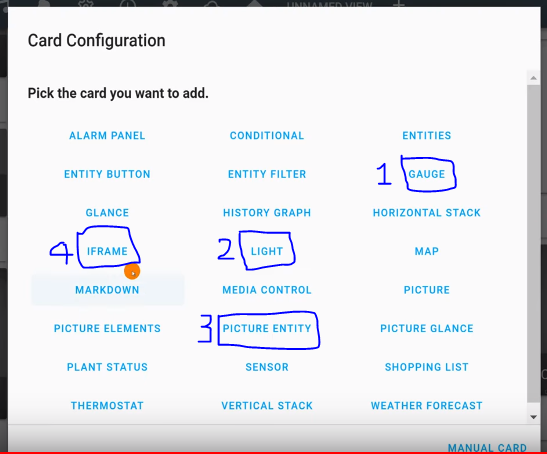
1.Gauge:
First of all, the Gauge card, this card helps you create half a beautiful color circle to show the level of a certain quantitative sensor. To create this card, go to the plus sign and select Gauge
The cells in the picture work as follows:
- Name: name of the card
- Entity: you choose the sensor you need in the drop down menu
- Unit: the unit will display the sensor, if not declared, it will take the default unit
- Minimum and maximum: you choose the lowest and the highest level corresponding to your sensor

In the Define Severity section, if you turn it on, you will be able to choose 3 color levels corresponding to 3 levels of value. You have the option to declare value for each of these levels. As I have chosen above 40 is Green, above 45 is Gold and over 50 is Red. Finally, click Save and we will create a Gauge card outside the interface.

2. Light
Next is the Light card. This card is simple. As its name suggests, this card is primarily for Light-class devices. It has an icon and a custom way for the Light class.
– Name: card name
– Entity: The selected items in the Light are dropped.

You can press the vertical dot in the upper right corner to access the Light and color control panel.

3. Picture entity:
This is a card that allows you to create an external camera. And now this card can help you stream the camera directly outside the interface without using a custom card. The configuration is as follows: (this card is not pre-selected, so you can just type a few lines)
– type; picture-entity (this is itself available, you don’t type)
– entity: camera.camera1 (type your camera name, if you don’t know the name of the camera, see the States section (<>)
– camera_view: live (command to help stream directly – verify by watching the seconds on the camera constantly jumping, and remember to add stream: into configuration.yaml)
Save and we will get the results out of the interface.

4. Iframe
This card is quite simple but useful. You can upload the website to the Home Assistant’s own interface, whichever page you like.
– Title: card name
– Aspect ratio: you choose the size
– URL; You enter the URL
Click Save to complete it.